Providing precision when ‘heat’ is on

When Alloy Heat Treatment (AHT) was established in 1974 it became the first UK company dedicated to the heat treatment of aluminium alloys. To satisfy increasing demand for its services, the Dudley-based subcontractor has continuously expanded its facilities and invested in the best-available technologies.

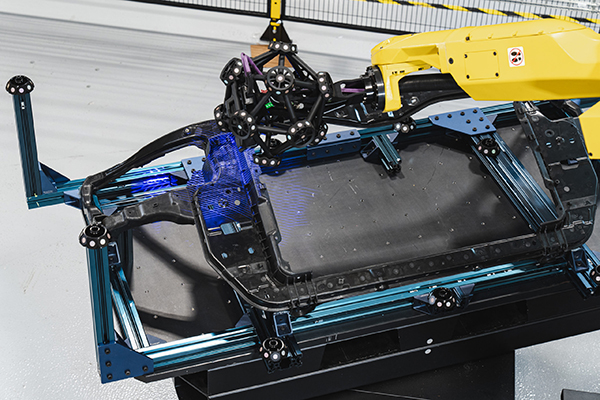
As unwanted distortions can occur in intricate aluminium products due to rapid heat transfer from the quenching process, AHT operates a setting department that removes distortion in the treated condition while products remain ductile. To help further increase AHT’s setting department capabilities and accelerate throughput, a Quantum E ScanArm was recently purchased from
Faro UK.
AHT director Ian Perks says. “The quality of the heat-treated components we deliver to our customers are of paramount importance to us. Owing to the speed and precision that a ScanArm-type device could provide, for many years we’ve felt that such an advanced inspection aid had a part to play in our organisation. Therefore, as our workload grew, we recently committed to placing an order. As we were aware of Faro’s reputation for being the market leader in this technology, we didn’t consider purchasing any other brand of laser scanner.
“After considering several Faro models, we chose the Quantum E ScanArm due to its speed, ease of use and accuracy specification,” continues Perks. “So successful has it been that we now anticipate a much quicker ROI than originally anticipated. In addition to being the perfect choice for measurement and scanning tasks, since using our new ScanArm we’ve found numerous other uses for it across our site.”
For further information www.faro.com

Spot pyrometer enhanced

Ametek Land, a specialist in temperature measurement, has further enhanced its Spot family of non-contact infrared pyrometers with a number of new benefits.

Adapted for temperature measurements ranging from 50 to 1800°C, the Spot model range meets the individual process challenges for industries such as heat treatment, metal and industrial processing.
The extended functionality of the family allows users to control multiple Spot pyrometers and actuators from one PC. This functionality results from its expanded Ethernet Modbus connectivity and SpotPro software, which provides a single control point to configure, store and view data for up to 40 pyrometers and actuators. Users can see all of the most important data on one screen, resulting in a clearer understanding of performance processes, effectively helping companies realise industry 4.0 connectivity capabilities.
Ametek Land’s Spot pyrometer enhancements provide additional input and output functionality, which means that enhanced electronic intercommunication is available as standard for online background compensation and/or emissivity input and output. Furthermore, the Spot range of pyrometers now has an additional analogue 4-20mA input and two 4-20mA outputs.
A sharper and brighter video (112 x 110 pixels at 30 fps) is also available for viewing on the rear panel of each device, while a faster and clearer video (512 x 288 pixels at 30fps) can be streamed live to a PC via the pyrometer’s integral embedded web server. Both video options can be used in conjunction with the patented Spot LED alignment system for precision alignment and focus, even in applications where the target is enclosed.
For further information www.ametek-land.com

Inspection service prioritises medical parts

CMM manufacturer LK Metrology has introduced a subcontract inspection service in support of UK and Irish ventilator – and other medical component and equipment manufacturers – which may not have sufficient quality control resources in-house.

When the government launched its Ventilator Challenge UK, the consortium behind it asked multinational firms such as Rolls-Royce, BAe and GKN to identify and involve OEMs and subcontract machinists in the aerospace, automotive and other industries that could help boost the production of medical parts. Designed to meet the target of 30,000 extra ventilators needed by the NHS to cope with the surge in COVID-19 patients, the consortium sought manufacturers with spare machining capacity, as well as ISO accreditation and expertise in metrology, to ensure the high level of quality required when making parts for medical equipment.
Some firms lacked the metrology element of the requirement. This factor prompted LK Metrology to expand the existing contract inspection service run from its headquarters in Castle Donington and make it available exclusively for those registered to supply ventilator and other medical parts.
Dave Robinson, marketing manager at LK Metrology, says: “We understand that manufacturers in the medical sector are needed to help provide valuable components, products and systems to combat the pandemic. The majority typically require the use of CMMs to measure, reverse engineer and assure the quality of many complex and precision parts, including prismatic, rotational and freeform types. For that reason, we are offering them a series of metrology services that we believe can be of assistance during these anxious times.”
For further information www.lkmetrology.com

Calibration laboratory attains ISO17025

Vision Engineering, a 61-year-old British designer and manufacturer of visual measurement and inspection technologies, has attained ISO 17025:2017 from UKAS and is now a UKAS-accredited calibration laboratory (No. 7706).

The award of ISO 17025:2017 by UKAS is the only mechanism that determines the technical competence and integrity of organisations offering testing and calibration services. ISO 17025:2017 not only contains requirements for the quality management system of the organisation, but includes detailed and specific technical criteria for the operation of the service, including ensuring the competence of company personnel.
Vision Engineering’s temperature-controlled calibration laboratory is now ISO17025:2017 certified for the calibration of measurement stages, instrumentation and artefacts performed at its production complex in Surrey. The full-service manufacturing facility includes a design office, machine shops, paint shop, cleanroom and assembly area. It is replicated in the US, with a wholly-owned, full-service manufacturing facility in Connecticut.
Measurement calibration and technical support is provided through a network of Vision Engineering subsidiaries in Germany, France, Italy, Japan, China, India and Malaysia.
The company supplies its non-contact and contact optical and digital measuring systems to a range of global manufacturers, including those in the medical device, aerospace, automotive and defence sectors, and their multi-tier supply chains.
Mark Curtis, managing director, says: “This is an independent and globally recognised confirmation by UKAS of the consistently high standard of our testing capability and calibration laboratory.
ISO standards confirmation is a key statement of our ability to address the requirements of our manufacturing and analytical customers across the world, and provide certainty of the quality of both our calibrations and calibrated metrology systems.”
For further information www.visioneng.com

Subscription model offered with Faro CAM2

The latest iteration of CAM2 2020 software has been unveiled by Faro.

The release includes a variety of performance and user-interface improvements, newly developed features and a new subscription licensing option. Users can now achieve greater control over their full manufacturing process at a lower up-front cost, says the company.
Faro’s subscription model empowers users to benefit from CAM2 with a lower initial investment, while scalability is offered through a flexible licensing model, ensuring users always have access to the latest version of CAM2.
Michael Carris, vice president of product marketing, says: “Faro CAM2 is a powerful, intuitive and application-focused 3D measurement platform designed to help users efficiently fulfil their quality assurance and inspection tasks. We’re pleased to offer a software experience developed directly from customer feedback, based on the metrology needs encountered every day. What’s more, this release strengthens the relationship between quality assurance and production operations with new capabilities that ensure even greater process control.”
New features include an enhanced measurement experience and an updated statistical process control tool which assists users in identifying production data trends that may indicate when a process is moving out of a specified parameter. Being able to predict this kind of error reduces wasted time, scrap and rework, and helps keep production capacity at full strength.
For further information www.faro.com