High quality with Trimos height gauge

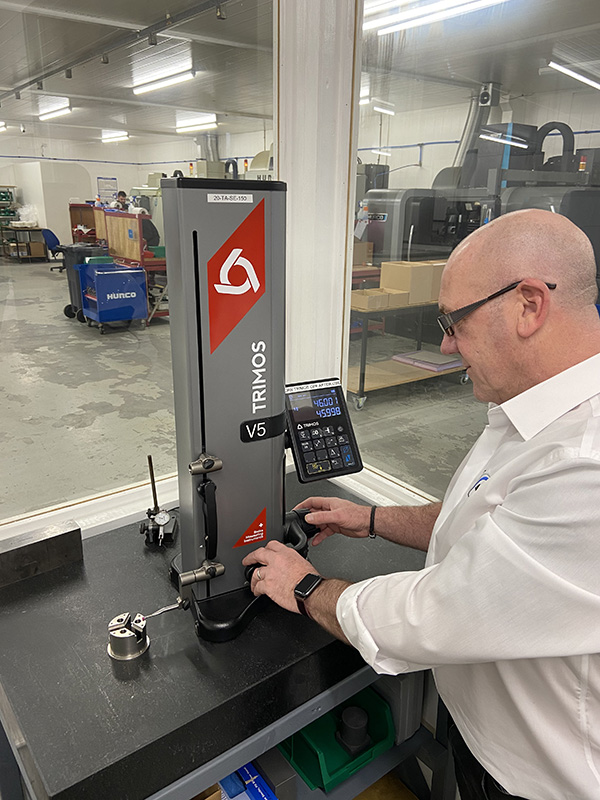
Ashford-based precision turned-parts manufacturer AES Precision Engineering has invested in a Trimos V5 height gauge from Bowers Group to ensure the quality of components it supplies to the medical, defence, aerospace, automotive and electronics industries.

Mark Wilson, director at AES Precision, says: “We have strict quality control procedures and must meet tight tolerances, so accuracy is incredibly important. The Trimos height gauge is a great solution for our general inspection requirements.”
AES typically uses a CMM for the measurement of complex components. However, for basic parts requiring quick and accurate measurements, a simple solution was needed that would be fast and easy to use. The business previously used a basic digital height gauge, but decided it was time to upgrade to a more sophisticated model with a few more features.
The Trimos V5 height gauge can be manually operated or motor driven, and has a clear display and user-friendly functions. Ease of use is a notable feature; so easy that all shop-floor operatives and inspectors at AES use the height gauge on a daily basis.
“We find the height gauge very accurate, and it has a great range of functions to suit our needs,” says Wilson. “Training was very straightforward and everyone here was confidently using the height gauge very quickly.”
Having the option of both manual and motor-driven operation means the height gauge can accommodate multiple users and achieve consistently accurate measurements, regardless of which mode is used. The side probe holders enable measuring with long, robust probes, which guarantee repeatability. AES calibrates the height gauge in-house at recommended intervals to ensure consistency.
For further information www.bowersgroup.co.uk

Transvalor becomes AFRC tier-one partner

Transvalor, a software developer in manufacturing process modelling, has joined the University of Strathclyde’s Advanced Forming Research Centre (AFRC), part of the National Manufacturing Institute Scotland (NMIS), as a tier-one partner.

The first partner to join the AFRC in support of its soon to be opened FutureForge facility, Transvalor provides process simulation expertise and deep insight into material behaviour resulting from manufacturing processes. This new relationship will provide France-based Transvalor with new opportunities for applied research activities and access to a range of industrial partners.
For further information www.strath.ac.uk

Reaching for the stars with Hexagon CMM

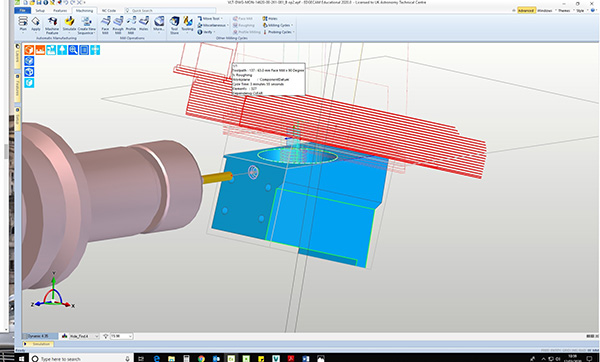
The UK Astronomy Technology Centre is working on two separate instruments that will teach astronomers far more about the universe than is known at present. Some of the parts are manufactured using tool paths created by Edgecam CADCAM software, and then measured to high accuracy using a Hexagon Global CMM.

The instruments will be fitted into the VLT (Very Large Telescope) at the Paranal Observatory in Chile – one of the most productive ground-based telescopes in the world.
One instrument is known as MOONS – Multi-Object Optical Near-infrared Spectrograph – which looks at many astronomical objects simultaneously, while gathering information from them all. The 75 mm square components for the precise calibration system which forms an essential part of the instrument, took a couple of hours to program with Edgecam. With the parts being used for holding optics, calibration was vital to ensure the incoming light source goes to the correct place. This outcome was achieved with the ATC’s Hexagon Global CMM, which checked the bores and positional tolerances of the components in the assembly.
The other instrument is ERIS – Enhanced Resolution Imager and Spectrograph – which will use the VLT’s adaptive optics to remove distortion from the atmosphere as the team hunts for planets outside the solar system.
The mechanisms for ERIS had to be within 10 µm for everything to line up, and the ATC used the CMM to guarantee that accuracy. Each individual mechanism was placed on shims attached to the optical bench. Measurements were taken to determine the centre of the mechanism and to make sure it was square and parallel. Shims were machined to bring the mechanism into the correct position, before the mechanism was rechecked. When the team was completely happy with each one, all components were placed together and a final optical check was performed.
For further information www.hexagonmi.com

Positive signs for subcontract market

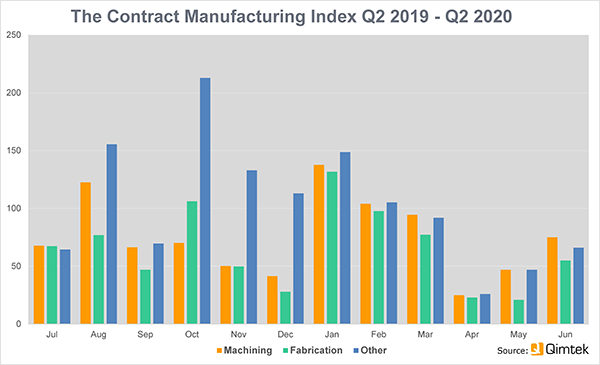
Although the effects of the COVID-19 lockdown saw the market for subcontracting fall by an unprecedented 56% in the second quarter of 2020, the latest Qimtek Contract Manufacturing Index (CMI) indicates that June showed signs of recovery.

The CMI for Q2 2020 stood at 49, compared with 112 in Q1 2020. The baseline figure of 100 represents the average value of the subcontract manufacturing market between 2014 and 2018.
Commenting on the figures, Qimtek owner Karl Wigart says: “While business was obviously down during the months of April and May, when both machining and fabrication were hit hard, things started to pick up in June. We anticipate a continuing improvement in the third quarter as buyers have told us they are looking at new projects, carrying out complete reviews of their preferred suppliers, and reshoring manufacturing. All in all, the outlook appears to be positive for those UK subcontractors that are in a position to take advantage.”
For further information www.qimtek.co.uk

Training videos for Baty Fusion software

A series of videos has been created by Bowers Group covering new functions included in the latest version of Fusion Software from Baty International. Offering a number of updates, the software now includes a range of technical and feature enhancements, such as lens error mapping, drag and drop positioning, custom reporting options and offline vision/touch-probe programming from CAD.

Geoff Jackson, business and product development director at Baty, says: “The videos explain and demonstrate exactly how the new features make our multi-sensor vision systems more capable and easier to use than ever before.”
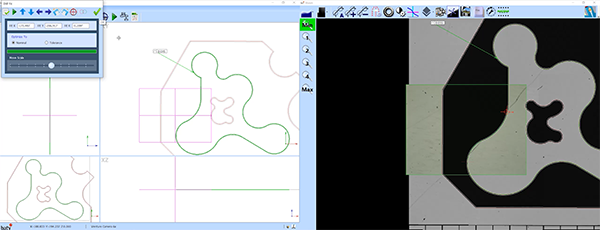
Several enhancements have been added to enable users to quickly drive the camera/probe to specific locations and/or features using simple mouse gestures. The new mini-map feature, for example, enables users to see which area of the part is being reviewed in detail, while maintaining a view of the entire component. Furthermore, touch probe moves are now a simple one-handed operation, thanks to a new touchscreen joystick.
DXF CAD files can be overlaid on stitched images of the entire part for profile comparison, while dimensioned drawings of measured parts are easily generated with a combination of standard geometry, as well as profile polylines for a clear visual representation of the scan. In addition, programming and positioning are now easier than ever, and many new dimensioning features are available to enhance reports, making them even easier to produce and tailor to customer needs.
The latest Fusion software can be used on a variety of Baty’s multi-sensor vision systems, including the Vumaster, Venture Touch, Venture Plus and Venture XT.
For further information https://vimeo.com/435689275