CT usability and uptime hits next level

Many improvements have been made by Nikon Metrology in its new 225 kV micro-focus X-ray CT (computed tomography) system: the XT H 225 ST 2x. According to the company, two of the new features are not present in any other industrial CT system. One is ‘Rotating.Target 2.0’, which thanks to more efficient cooling enables a 3x smaller focal spot size for clearer imaging. The other, ‘Half.Turn CT’, is a novel method for almost halving the angle through which a specimen rotates during the X-ray cycle, speeding the process without loss of image quality.

Operation is greatly simplified and efficiency doubled, enhancing the system’s suitability for a range of applications. The intrinsic benefit of X-ray CT is that it allows both the non-destructive inspection and measurement of a sample’s exterior and interior. Nikon Metrology’s XT H 225 ST 2x, which has undergone thousands of hours of rigorous testing, is distinguished by its ability to be tuned in line with the part under investigation so that optimal results are produced every time.

Rotating.Target 2.0 maximises the quality of data collected and hence image resolution. This feature also doubles the running time before preventive maintenance is required, lowering costs and raising equipment availability. Spinning the target dissipates the heat generated by the small focal spot size more efficiently, enabling continuous generation of high-power X rays and an increase in scanning speed and resolution, without the need for cool-down.

Another new feature is Local.Calibration, which allows rapid, repeatable, automated calibration of voxel size at any CT scan position, rather than the user having to perform the function manually. This leads to a radical improvement in measurement accuracy. Extra benefits are that the procedure is de-skilled and dimensional accuracy is traceable.

For further information
www.nikonmetrology.com

Profile projector saves time

Baty International, part of the Bowers Group, recently supplied Broanmain Plastics with a Baty R14 profile projector to assist with its inspection and quality processes.

As a family-run technical trade moulder, Broanmain Plastics manufactures compression and injection moulded components used in various applications across many industries including, aerospace, electronics, railway signalling, filtration and climate management systems.

Between two sites in Surrey and West Sussex, Broanmain Plastics houses machinery with capacities up to 550 ton and a shot weight of over 1500 g. It is imperative to not only make sure the component is visually perfect, but also fail-safe where customers require the utmost safety from the part.

Looking to improve on the consistency of manufactured components, and work more effectively within time constraints, Broanmain Plastics decided to invest in the Baty R14 profile projector.

Managing director Jo Davis says: “Quality is vital for different reasons. For some, it’s safety-critical, for others the requirement may be more aesthetic. But what’s always required is consistency. I’ve been really pleased with the help, support and services from the Bowers Group. While I don’t operate the machine myself, we also use the shadowgraph in our tool room. The Baty R14 makes the process quicker and easier. It’s been an invaluable installation to both the quality team and the company as a whole.”

Speaking of the Fusion software, tool-room manager Kamil Stec adds: “Working with injection moulding, the parts we measure are often hard to fixture. We’ve found that the software’s feature align option saves a lot of set-up time. There are also several handy construction options available.”

For further information
www.bowersgroup.co.uk

The new home of 3D scanning

GOM will be running the UK launch of the #HandsOnMetrology network via a webinar on 31 March. The event is in partnership with Central Scanning, a local #HandsOnMetrology partner that will be introducing the latest hand-held 3D scanning systems from GOM and Zeiss.

#HandsOnMetrology is a new global 3D scanning network and provides a digital go-to for everything the industry wants to know about 3D scanning. GOM, a Zeiss company, operates the platform.

From step-by-step set-up instructions to more advanced tutorials and expert hacks: the platform is made for learning and getting inspired. According to GOM, #HandsOnMetrology gives users all the information they need to deliver 3D scanning excellence. The platform supports the community of designers, technicians, engineers, scientists and specialists with valuable knowledge to increase product quality, optimise processes and expand possibilities.

Kevin Hawley, director at GOM UK, says: “We know there are many applications to cover with 3D scanning, from large parts like welded frames and huge castings for power generation, to highly complex and detailed parts. Sometimes, extremely portable systems are necessary for remote locations or confined spaces. All of these tasks need the right solution and #HandsOnMetrology is there to help you with this.”

He continues: “During the webinar we will cover the features and benefits of this new platform, see some of the makers’ stories to learn how #HandsOnMetrology has helped their processes, and meet products in the portfolio. A Q&A will end the webinar.”

For webinar registration
https://is.gd/efoxet

RDS Precision selects Accretech

Given the intense competition between engineering subcontractors, it is often the businesses with unique selling points that stand out from the crowd. One such company is Washington, Tyne and Wear based RDS Precision Engineering. In addition to establishing a reputation for delivering on time and on budget, the busy company’s main differentiator is its highly developed quality ethos. To help ensure the premium quality of production output, regular investments are made in high-precision inspection equipment.

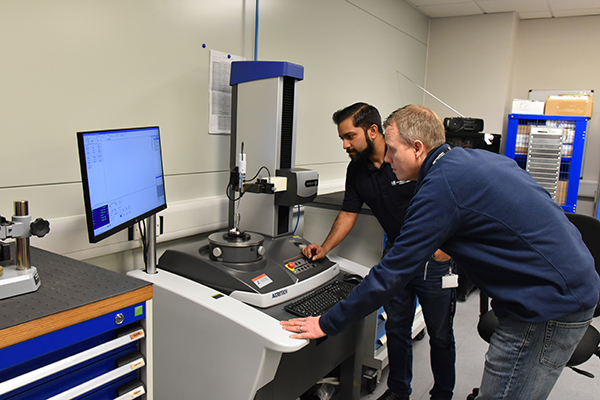
The latest addition to RDS Precision’s quality control department is an Accretech SurfCom NEX 041 CNC measuring station that provides the company with contour and surface roughness measurement capabilities.

Director Rob Bone says: “We use a selection of standard inspection equipment, such as CMMs and vision measuring systems. Also, given the demanding specifications and challenging dimensional tolerances of our components, we use specialised metrology equipment, like our recently purchased advanced Accretech CNC contour and roughness measuring system.”

The SurfCom NEX 041 is suitable for the measurement of contour geometries on parts that include ball screws and large bearings.

“We were previously using a shadowgraph to measure a family of parts with demanding angular contour specifications, and struggled to achieve the required levels of precision,” says Bone. “Now, however, we’re able to load each of these parts on to the SurfCom NEX 041, recall the relevant program and instigate a precise, fully automatic CNC measuring routine. Not only has the Accretech machine improved our precision standards related to these challenging components, it has also slashed the time taken to inspect them.”

For further information
www.accretech.eu

Enhanced furnace temperature monitoring

Ametek Land, a manufacturer of monitors and analysers for industrial infrared non-contact temperature measurement, has launched the MWIR-B-640 mid-wavelength borescope for furnace applications. Users of the MWIR-B-640 can take, store and trend accurate and radiometric temperature measurement image data over the lifetime of the furnace, providing a continuous and clear view, even through heavy smoke and hot atmospheres.

Applications for the device include hydrocarbon processing reformers; heat treatment; reheat, cement kiln and annealing furnaces; biomass, waste and coal boilers; and incinerators. The new borescope features spectral filtering and a high thermal and spatial resolution to deliver clear live images of the furnace, boiler and stock, with more than 300,000 accurate point temperatures measuring in the range of 300-1200°C and 500-1800°C.

Notably, the high-resolution image of the MWIR-B-640, combined with a 90° wide-angle field of view, allows the imaging and measuring of multiple areas simultaneously. With a wide-angle view into the furnace, users can see the image data in real-time from the safety of the control room. With only a small opening in the wall, the MWIR-B-640 can accurately profile the temperature of the entire furnace without affecting the furnace atmosphere, stock temperature or energy consumption.

“The MWIR-B-640 is an invaluable tool that will prolong furnace and boiler lifetime, optimise production throughput, reduce energy consumption and improve stock temperatures,” says David Primhak, director of development and product management for Ametek Land. “It has a range of innovative features that ensure it is user-friendly, extremely accurate, and offers a high level of asset protection.”

For further information
www.ametek-land.com