When BCT Engineering opened its doors for business over 30 years ago, the Woking-based company began making its revenue from producing performance parts for motorcycles. Over the past three decades, this activity has evolved into the automotive, automation, offshore, aerospace and motorsport industries. With a concerted effort to accelerate productivity, the subcontractor has enlisted the support of cutting tool specialist Industrial Tooling Corporation (ITC).
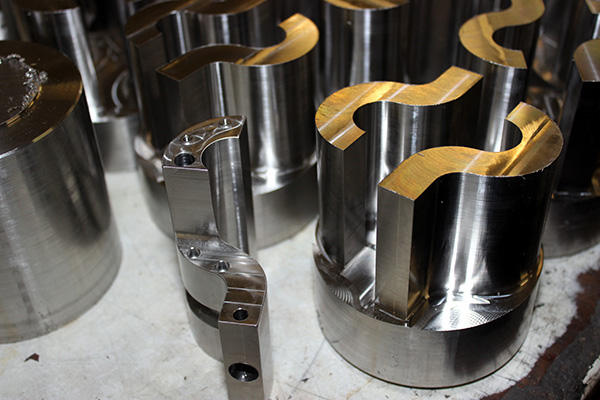
Stating the impact that ITC has had on the subcontract business, BCT Engineering’s managing director Tony Ryan says: “The help we’ve had from ITC has been invaluable. We have one product that is part of a modern ‘touch-button’ domestic tap for boiled or chilled water, and we were initially making the parts from plate material. However, we had problems that were down to both the type of material and the machining methods we were applying. ITC came along, had a look at the way we were machining the parts and changed the tools and the machining strategy. This has saved at least an hour on each component.
“To achieve this, we are using a combination of tooling that includes high-feed tip tools to go around the outside of the part and a solid-carbide end mill to go through the centre of the component. When we started to machine the part, we were going far too cautiously with the speeds and feeds, as we didn’t realise the performance parameters of the tools. Now, we have evolved the situation and drastically reduced the cycle times, while process reliability has also been improved.”
Commenting upon the domestic tap component, ITC application engineer Matt White says: “The task for the tap parts was for them to be machined in a shorter time, while maintaining a safe and reliable process. Tony had the idea to change from making one component at a time, to machining two simultaneously. We looked at the job in some depth and recognised that applying a combination of indexable tipped tools and solid-carbide end mills was the best route forward. In this case, we applied the Widia M370 high-feed indexable end mill to machine the profile of the parts and then used an ITC 20 mm diameter solid-carbide five-flute 5021 cutter to rough machine the slotted form in the centre of the parts. The final step was the application of an ITC solid-carbide six-flute 6051 long-series finishing tool.”

From a process stability perspective, White adds: “We are now looking at machining five billets per indexable edge of the high-feed Widia M370 on 316 stainless. With a 0.6 mm depth of cut and 180 m/min spindle speed, and a feed rate of 0.5 mm/tooth, this is a very productive run time. What Tony now knows is that he can let the job run and leave the machine to do other tasks; he is guaranteed to return to the machine at a later time with five billets reliably machined.”
The stainless steel tap components are machined in batch sizes of 50-off pairs/sets, and the machining time of four hours per pair/set has been cut from 4 hours to 2 hours, a 50% cycle time reduction for BCT Engineering.

Looking at another component, an aluminium laser casing that is produced in batches of 20-off, the application expertise of White once again managed to reduce cycle times; this time by over two hours per part. Referring to the opportunity to work on this project, White says: “After successes on stainless machining at BCT, I had the chance to run the 40 mm diameter VHSC Widia cutter to rough-out pockets on large aluminium casings.
“Previously, BCT was using a slightly different tool on the job and we were only able to run at a feed in the region of F2000. With the new ITC Widia VHSC tool, we can run at F3500, while doubling the depth of cut. This is saving us at least an hour per component, just from the pocket machining. The total savings are significant as we machine a relatively large quantity of these parts.”
With regard to tool life and performance, White says: “Using the three-tipped Widia VHSC indexable tool, parallelism has improved, tool life is much better and performance is fantastic. BCT has some aluminium casing type jobs for which we needed to remove cycle time; the Widia VHSC series has been very successful at this task.”
Concerning the cutting parameters, White says: “The cutting data on this job is dictated by the maximum spindle speed restriction of 8000 rpm. However, we have managed to run the VHSC at 7000 rpm with a 5° ramp-down angle to a 3 mm depth of cut, and then we run around the pocket at almost 3500 mm/min.
“Previously BCT was utilising the conventional Widia VSM11 tools, which is like the APKT style insert. The trouble with these standard 90° shoulder mills is that they inherently cannot be fed very fast on aluminium. So, in the past it may have been better to run with a larger solid-carbide multi-flute tool than use indexable tools. With the new VHSC, we have the option to run much faster. For example, you can go from 0.1 mm per tooth for a standard shoulder mill to 0.3 mm per tooth and beyond with the Widia VHSC. In addition, you can really get the spindle speed up; we are looking to run a 50 mm diameter tool at speeds around 12,000 rpm with 6000 mm/min feeds.”
Despite removing the material much faster, the surface finish is actually improved, as White explains: “The more you push these tools by running higher feeds and higher revolutions, the better the surface finish. From a tool life perspective, BCT haven’t changed an insert edge yet. This may not be good news for our area sales representative, but it’s certainly good news for Tony and BCT.”
Concluding on the service from ITC, Ryan says: “We now buy virtually all of our cutting tools from ITC. Most cutting tool manufacturers would not be able to give us the service that ITC has provided. Matt White and Dave Cleeve have spent upwards of two to three days initially sorting these two jobs for us, with continued follow up visits to further improve performance. The results have been fantastic and we are delighted by their commitment to help our business.”
For further information www.itc-ltd.co.uk


