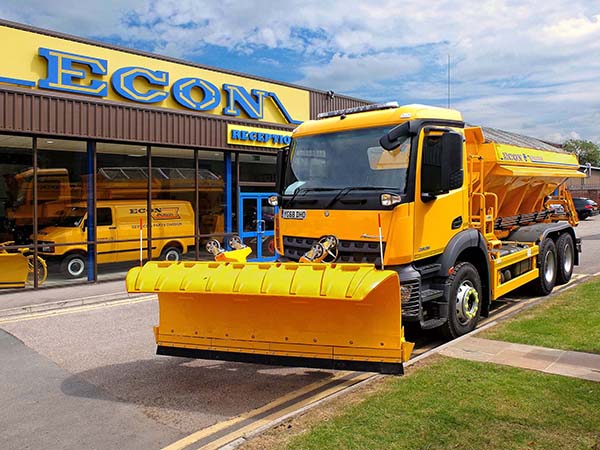
For those finding themselves driving behind a gritter or salt spreader in the UK this winter, there is an 80% chance it was bought or hired from Econ Engineering by the local council or highways contractor. The company is the largest British manufacturer of such vehicles, producing 360 units per year at its 88,000 sq ft factory, which opened in 1980 in Ripon. Additionally, Econ operates a growing hire fleet of currently more than 800 units, which has boosted annual turnover to over £34m, making the firm a major contributor to the local economy.

In fact, in its 50th year, Econ is experiencing an unprecedented order book, partly fuelled by recent harsher winters, but also due to the multi-body products that allow customers to utilise one chassis for multiple tasks, such as road repair and winter maintenance, making the investment usable throughout the year.
The 220-employee company’s dominance in the market is down to the premium quality of its products, with all design and manufacture carried out in-house, including the painting of components. For nearly one-third of its 50-year existence, Bystronic has been helping Econ to maintain the high level of component accuracy that underpins its reputation for quality.
Initial credit for this success story goes to the late Bill Lupton, who single-handedly started a business towards the end of the 1950s in a barn on his family’s farm to make flail mowers and hedge trimmers. Exceptionally cold and freezing weather during the winter of 1962/63 brought England to a standstill, with many being cut off for weeks. This turn of events inspired Lupton to develop the first salt-spreading vehicle that would keep the country moving and the wheels of industry turning.
To manufacture the salt spreaders, he started Econ Engineering in the autumn of 1969 on an old brewery site in Ripon. By then, the M1 motorway had opened, as well as sections of the M2, M4 and M6, and local councils, notably Lancashire and Westmorland, were expressing considerable interest in winter maintenance operations such as salt spreading and gritting.

Fast-forward 34 years and 2003 saw the second generation of Luptons – Jonathan and Andrew – take over the company. They were instrumental in developing contract hire for gritters and snowploughs at a time when public spending cuts were making new equipment purchase difficult. Underlining their commitment to building up this side of the business, in 2005 the brothers increased the fleet size through the acquisition of a major competitor, Municipal Hire Services.
It was in the early 2000s that the first Bystronic laser machine replaced a turret punch press and a plasma cutter for processing the majority of components made from mild steel plates. In addition to being used in the manufacture of gritting and salt-spreading equipment, the components also find their way into snowploughs, as well as bodies for highway maintenance and road patching that Econ mounts to lorry chassis, often Mercedes and DAF.
The laser machine, a ByStar 4020 with a 4 kW CO2 power source supplied by Bystronic UK, greatly increased production efficiency and component accuracy. Sheet metal up to 4 x 2 m could be processed on the machine, but its 4.4 kW and then 6 kW successors were able to accept sheet up to 6.5 x 2 m (nominally – in practice 1.83 m wide). Larger body panels can be produced without welding and the productivity of smaller components is boosted by the ability to nest and cut more parts in one sheet, at the same time reducing the amount of wasted material in the skeleton.
Installed in 2014, the current laser machine works 24/7, processing up to 35 tonne of steel a week into any of 87,000 different components produced in batch sizes ranging from 5 to 30, and to an accuracy in some cases down to ±0.5 mm. With such a large variety of part numbers, extensive use is made of modern MRP software, as well as colour coding of components on the shop floor according to their material, thickness and product type.
Bystronic’s own BySoft offline programming software automatically nests the components for maximum sheet utilisation. The software then produces the cutting plans, in this case up to 14 days in advance of scheduled production to assist ordering of material, and monitors the manufacturing processes in real time. The effectiveness of these procedures is evidenced by an above-average OEE of 63%, representing the proportion of time the laser is actually cutting metal.
More than 70% of the output from the laser machine is folded. The press operators create folding programs for the three Bystronic press brakes directly at the machine controls. Two of the machines, installed around a decade ago and rated at 320 tonne/4.1 m and 150 tonne/3.1 m, are positioned side by side. These machines are used either independently or in tandem for bending very large components. Also in use is an Xpert 40 tonne/1 m capacity press brake, which arrived in 2018 for bending smaller parts more efficiently and hence cost effectively. The Xpert 40 can easily be relocated within the factory to where it is most needed.
Other machines in use from the Swiss manufacturer are a VR 10×4000 jobbing guillotine and, for deburring components, a belt grinder from German firm Weber, for which Bystronic acts as UK sales agent. The latter is used for removing sharp edges from laser-cut components and to descale them ready for shot blasting and painting. Every item of production equipment in the metal preparation area, except for the sawing machines, has been supplied by Bystronic.
Colin Trewhitt, who has worked for Econ for over 30 years and is currently factory manager, says: “When we bought the first Bystronic laser cutter back in 2003, we spent a lot of time reviewing alternatives on the market. We drew up a check sheet detailing everything from cost of ownership to production output and service support. Of the three potential suppliers on our shortlist, Bystronic came out on top and we’ve stayed with them ever since.”

Jonathan Lupton, joint managing director adds: “We’ve always tried to innovate and strive for excellence, and nowhere is that more apparent than in our use of the laser to cut steel in our body shop. Despite the machine representing a considerable expense at the outset, it was another example of how we always lead the way in our industry. The investment has more than paid off in terms of higher production output, while improved accuracy has almost eliminated fit-up during assembly and cuts costs further.
“We’ve gone from strength-to-strength by focusing not only on quality but also on the needs of our customers,” he continues. “That is why we have a UK-wide network of depots for servicing and recalibrating our equipment in the field, including a new one that opened recently in Alloa, and another due to open in Cardiff in spring 2020.”
Innovation is the watchword at Econ. The company was the first in 1989 to invent the quick change body (QCB) system that allows a single chassis to have multiple applications, for example by the addition of an asphalt hot box for road repairs or for use as a tipper, crane or gulley emptier. This innovation reduces capital investment by a council, which no longer needs multiple vehicles to satisfy the same range of year-round tasks.
A recent Econ invention was a ‘Spargo’ system that controls grit or salt spray and width patterns from the cab, automatically optimising the amount of product used and hence saving cost as well as protecting the road surface. The system also provides one-touch control for lowering the snow plough, turning on the gritter’s beacon bar and performing other functions, making the driver’s tasks easier and less tiring. For greater efficiency, the Spargo system is connected to the vehicle’s GPS to help plot the most effective route. New technology in the company’s sights include driverless vehicles and liquid de-icers, intended to be less harmful to a road surface.
For further information www.bystronic.co.uk


