Leaving nothing to chance

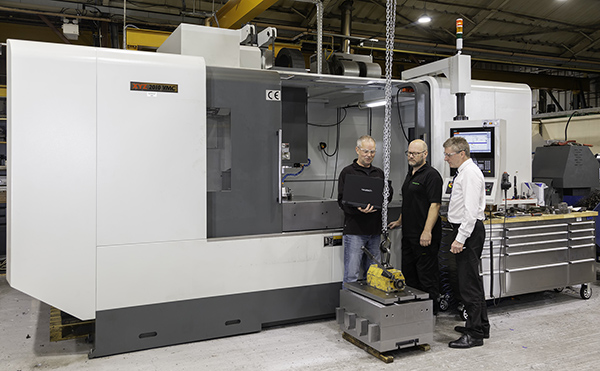
Specialist tooling solutions supplier Cogsdill-Nuneaton has recently invested in a new Doosan vertical machining centre from Mills CNC. The machine, a DNM 6700, has been installed at the company’s 27,000 sq ft facility, where it is being used, primarily at this moment in time, to produce precision components for Cogsdill’s range of ZX facing and contouring-head tooling systems. These components include different sized front-mounted cross slides, with slide ranges from 200 to 900 mm, which are machined from nitrided and carbon steel.

The decision to invest in the new Doosan DNM 6700 machine followed an internal review undertaken by Cogsdill into its existing CNC machine tool capabilities and, in particular, whether current milling capabilities were adequate to meet growing demand from customers worldwide for its large-capacity tooling solutions.
Says Lee Donaldson, executive director, Cogsdill UK: “We invest regularly in advanced CNC machine tool technologies, and the audit and review highlighted a potential improvement opportunity within our existing CNC milling capabilities.”
With global demand for its larger tooling solutions on the increase it became clear to management and production staff at Cogsdill that investment in a new, reliable and large-capacity vertical machining centre was required.
“To ensure we acquired a vertical machining centre that matched our needs and expectations we did our homework and created a ‘key criteria’ checklist before investigating the market,” says Donaldson.
In addition to the working capacity of the new machine, other requirements included the machine’s cutting performance, its availability and price, as well as the scope and scale of the technical back-up and aftersales support services provided by the machine tool supplier.
“Although we hadn’t invested in a Doosan machine tool previously, we knew that Doosan machine tools have a good reputation in the market, and that Mills CNC, the exclusive distributor of Doosan machines in the UK and Ireland, is a successful company with a significant market presence,” says Donaldson.

Cogsdill also had direct experience of working in collaboration with both Doosan and Mills CNC as a technical partner; supplying advanced tooling solutions to both. A recent example involved Cogsdill working in partnership with Doosan and Mills CNC to deliver a turnkey process for auto-loading facing heads, boring tools and splining tools, into a Doosan horizontal boring machine (a DBC 130) for a US-based oil and gas customer.
Following extensive research into the market, Cogsdill ultimately decided on investing in a new DNM 6700 vertical machining centre.
The DNM 6700 is a large-capacity vertical machining centre equipped with a work table measuring 1500 x 670 mm and axis travels of 1300 x 670 x 625 mm in X, Y and Z. A high-torque (118 Nm) direct-drive spindle (18.7 kW/12,000 rpm) also features.
Says Donaldson: “The working envelope of the machine was of critical importance, and the DNM 6700 large-capacity working envelope enables us to machine larger components [as well as smaller components] in a single set-up. This means faster production and reduced part cycle times.
“Similarly, the cutting performance of the machine was important,” he adds. “The DNM 6700’s direct-drive spindle technology gives us ability to achieve high volumetric removal rates when required, as well as fine finishes. It is a very versatile machine.”
To increase the machine’s flexibility further still, Cogsdill, as part of its investment in the DNM 6700, also ordered a 4th/5th axis unit to be supplied with the machining centre.
In terms of availability, Mills CNC has at least 70 new Doosan machines, at any given time, in stock at its technology campus in Leamington. A significant proportion of these machines comprises its best-selling DNM vertical machining centres.
“The quick availability of the new machine was important,” says Donaldson. “We attended MACH 2018 where we visited Mills CNC’s stand and supplied them with a ‘letter of intent’ to purchase a DNM 6700. Just a few weeks after the event, once we had acquired external grant-based funding, the machine was delivered, installed and commissioned.
“I have to say that we were presently surprised with the machine’s price,” he continues. “There is a lot of technology and functionality packed into the DNM 6700 and, while price isn’t everything, it clearly is an important factor when making any capital investment.”

SONY DSC

With regard to support, all Doosan machines supplied by Mills CNC are backed by the company’s aftersales service and support.
“Mills CNC’s reputation in the market for its aftersales support is second to none, and we have direct experience of this having worked in partnership with Mills delivering a number of turnkey and process improvement projects for customers,” says Donaldson. “Just knowing that you have Mills’ technical, applications and service back-up at your disposal inspires confidence.”
Since being installed at Cogsdill’s facility in Nuneaton, the DNM 6700 has been used to machine front-mounted cross slides housed in the company’s ZX facing and contouring head tooling systems. These cross slides are rough machined from solid on the machine prior to stress relieving, and are then semi-finished, heat treated and ground before final finishing operations take place.
On average, machining times for roughing, semi-finishing and finishing are 60 minutes, 90 minutes and 30 minutes respectively.
For further information www.millscnc.co.uk

Partnership for automated QC solutions

Metrologic Group and Creaform have entered into a partnership in which Creaform integrates Metrologic Group’s software suite with its new CUBE-R 3D automated dimensional inspection system.

This laser scanning, all-in-one solution features Metrologic Group’s 3D measurement programming and inspection software packages, Silma and Metrolog X4 i-Robot, and offers robotic operations in an automated industrial measuring cell.
CUBE-R is an off-the-shelf, fully integrated, automated 3D inspection solution designed for manufacturing companies requiring automated quality control directly on the shop floor. The machine optimises the MetraScan 3D-R metrology scanner with the use of Metrologic Group’s robot-dedicated measurement software, Metrolog X4 i-Robot, thus providing a flexible plug-and-play alternative to CMMS and other robot-mounted, structured-light 3D scanners.
The CUBE-R extends the capabilities of the MetraScan 3D-R for the dimensional measurement of parts ranging from 1 to 3 m with metrology-grade volumetric accuracy under real shop-floor conditions.
Integrating Metrologic Group’s Silma X4 i-Robot and Metrolog X4 i-Robot, the CUBE-R delivers an array of benefits. For instance, the software calculates the most efficient positioning of the sensor and the best collision-free trajectories for the robot. In addition, the same software manages the optical 3D measurements and simultaneously provides advanced analysis of the results – even when computing huge point clouds –, and edits personalised, easy-to-understand reports. In short, Metrolog and Silma X4 i-Robot turn the CUBE-R into a simple automated measurement solution, easily operated by a non-specialist operator.
For further information www.creaform3d.com

RPI supplies Rolls-Royce with five iMAPs

RPI UK, a specialist developer and manufacturer of precision positioning devices for high-accuracy rotary and angular inspection systems, has supplied five integrated measurement assembly platforms (iMAPs) to Rolls-Royce and its approved MRO facilities.

iMAP, which is said to reduce inspection times by 90% and improve gauge repeatability and reproducibility by up to 10 times, will be used by Rolls-Royce to measure and assemble engine turbine rotors at its sites in Derby and Germany.
Atlanta-based Delta Airlines, which carries out MRO of the Rolls-Royce Trent engine, has also purchased an RPI iMAP machine – the first one sold to a Rolls-Royce approved MRO facility.
Jim Palmer, RPI’s sales manager, says: “We’ve been working with Rolls-Royce for over 30 years so its great news that both Rolls-Royce, and their approved MRO facilities, are choosing to invest in iMAP, which has been independently verified to give significant operational improvements over traditional measurement methods.”
iMAP’s data acquisition software AccuScan enables manufacturers to measure up to 4000 data points on up to eight surfaces simultaneously (per revolution), thereby significantly reducing process times compared with other available methods. This significantly improved inspection data is then used by IntelliStack, iMAP’s rotor stacking program, to solve the mathematical problem of how to best assemble a multi-stage rotor assembly and achieve minimum runout or unbalance of the finished rotor.
Combining a motorised
high-precision air bearing rotary axis, rigid column unit, anti-vibration granite base and AccuScan multi-channel circular geometry inspection software, IMAP is intended to deliver productivity improvements in turbine rotor assembly.
For further information www.rpiuk.com

Faro TracerSI boosts laser-guided assembly

Faro has released the next generation of its Tracer platform for laser-guided assembly and verification: the TracerSI laser projection system. TracerSI is a fully integrated solution that includes improved hardware built upon the previous TracerM product and BuildIT projector software.

Like TracerM, TracerSI uses 3D CAD information to project 3D laser images on to a physical surface and provide a live, visually rich virtual template that assemblers can use to quickly position components with confidence. This solution can deliver significant ROI as organisations no longer have to invest capital in physical templates, such as wood or metal moulds or tools, which also have to be built, maintained, stored and sometimes repaired. Additionally, real-time manufacturing errors are minimised and, as a result, costly scrap and rework costs are reduced. There are actual, documented cases where rework and scrap savings alone lead to payback periods as short as 90 days, says Faro.
TracerSI is said to represent the first of its kind laser scanning camera, with projection and high-resolution image scanning capabilities throughout its entire projection volume. Since the laser scanning camera does not rely on lenses or conventional image capture, the depth of field is equal to the full projection range. In addition, there are no lighting limitations since it is laser illuminated, and there are no restrictions on frame size or resolution.
Faro’s TracerSI moves guidance assembly forward through its native support of feature-based alignment. As a result, retroreflectors (special targets that reflect light back to the original source) do not have to be placed on or around the object or assembly. This convenience substantially reduces the time required for set up.
For further information www.faro.com

Instant measurement system available from Vision

Vision Engineering has announced the general availability of its TVM field of view (FOV) video measurement system.

The non-contact TVM combines a small footprint with larger system performance and ease of use. Time-saving, instant FOV measurements and a moving stage allow larger components to be measured quickly and easily.
The TVM series includes the TVM20 and TVM35, with FOV sizes of 20 and 35 mm respectively. Both systems are designed to meet rigorous quality assurance applications in automotive, aerospace, medical and plastics manufacturing. Cylindrical, flat or square components can be measured instantly within the FOV at the click of a mouse.
As with other measurement and inspection systems from Vision Engineering, TVM systems can be configured to suit specific applications, including small pressed components, turned parts, injection moulded plastics, tubes and cables, while the addition of a manually controlled stage extends measurement for larger components up to 200 x 100 mm.
The combination of the TVM’s flat-field telecentric lens and collimated sub-stage lighting, featuring a newly developed quadrant LED ring light, creates a sharp image of components on the HD monitor, and significantly improves the video edge detection of complex parts such as threads and valves.
The TVM’s user-friendly software comprises a suite of features that includes simple data import/export, image stitching and reporting facilities.
TVM20 and TVM35 systems are manufactured in the UK at Vision Engineering’s global headquarters.
For further information www.visioneng.com